Migrate CentOS and Windows Xen Guests to KVM
Overview
One of the clients in our user Slack channel at Limestone Networks recently posed an interesting challenge they were facing trying to migrate to our KVM based OpenStack cloud: how can we migrate our Xen guest instances and images without a full rebuild?
Should be easy, right? Just convert the disk container to the RAW format supported in our cloud using qemu-img convert and upload the resulting image to Glance, simple as that. It actually was almost that simple working with the Linux based images, but the Windows guests proved to be a much greater challenge.
What’s an .ova anyway?
OVA is a tar archive. That’s all. When reading documentation online trying to figure out what an OVA actually is, it’s easy to miss the most important fact to a cloud operator trying to work with a virtual image: OVA is not a disk container, it is an archive that probably contains a disk container inside. So step one when dealing with OVA is tar xf <image name>.ova.
The extracted contents will include a .ovf file, which is an XML file containing metadata definitions describing the virtual appliance. Also inside should be a disk container of some sort, probably a .vmdk or .vhd file. This is the actual instance disk we need to convert to run on our cloud. At Limestone, we only support RAW disk images because we leverage Ceph for copy-on-write images on many of our hypervisors, which requires RAW formatted images to work properly.
Now for the “easy” conversion: CentOS 6 Xen guest
Converting a .vmdk to a .raw is usually as simple as running qemu-img convert -O raw <image name>.vmdk <image name>.raw. You can then use qemu-nbd -c /dev/nbd0 <image name>.raw to mount the image to a block device, and then run parted /dev/nbd0 print to view the partition table of the image. If there is no partition label or table present, then your image most likely did not convert properly.
However, none of that matters in this case because we’re dealing with .vhd images today, which we could not convert using qemu-img convert. Instead, we need to use the vhd2img tool, which I have mirrored here. Running vhd2img <image name>.vhd <image name>.raw will convert the image to the correct format, which can then be uploaded to Glance and used to launch an instance.
So the general process to get the CentOS 6 instance image converted was:
wget -O centos6.ova https://url/cent6.ova
tar xf centos6.ova
ls centos6 # note the name of the .vhd file here
git clone https://github.com/logan2211/vhd2img
pushd vhd2img
make
./vhd2img ../centos6/imagename.vhd ../imagename.raw
popd
# now upload the resulting imagename.raw file to Glance
source openrc # openstack credentials openrc file downloaded from Horizon
# to run the next command you will need python-glanceclient installed on your server.
# otherwise you may wish to upload the image through Horizon.
glance image-create \
       --disk-format raw \
       --container-format bare \
       --visibility private \
       --progress \
       --property hw_scsi_model=virtio-scsi \
       --property hw_disk_bus=scsi \
       --name "my converted xen image" \
       --file imagename.raw
Last, the challenge: Windows Server 2008 R2
The first place to start when preparing a Windows guest to run on an OpenStack KVM based cloud is the virtio driver pack maintained by Fedora. It is essentially required to produce a working Windows guest image. Typically Windows will not boot without the virtio disk bus drivers installed, and thankfully the client was able to install them prior to performing the image export from their Xen environment.
Missing virtio drivers in the BCD
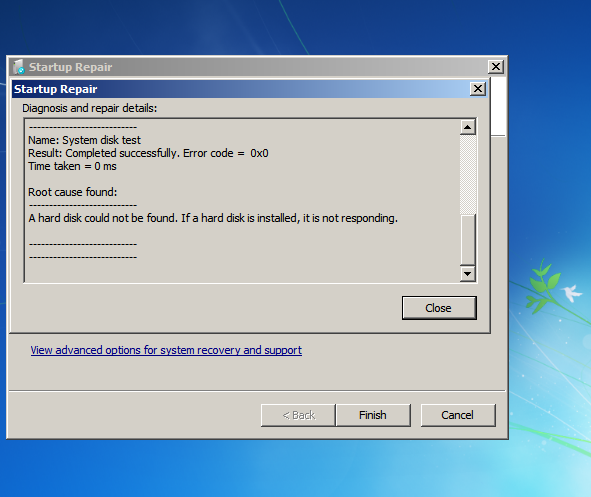
After performing the above vhd2img conversion on the Windows guest image and uploading it to the cloud, it booted to a recovery environment complaining that it could not locate a bootable Windows disk. Obviously this indicates that the disk bus drivers are not present, but this was puzzling since we knew they were installed.
Eventually I found that the disk bus drivers get bundled into the Boot Configuration Data (BCD) file which is used by Windows to boot the OS. It seems that the client installed the drivers but did not rebuild the BCD. To fix this, mount the image on a different Windows instance and find the \Boot\BCD file under the root of one of the partitions (in this case D:\Boot\BCD). Also find the partition where the \Windows directory resides. They may not be the same partition. In this image Windows was mounted at E:\Windows. So the command to regenerate the BCD was:
bcdboot E:\Windows /l en-us /s D:BSOD
After rebuilding the BCD I expected the image to immediately boot directly to the logon screen, right? Nope. It threw a BSOD during boot to both Normal and Safe Mode. After a great deal of troubleshooting I eventually found that the Xen drivers were conflicting with something in our KVM environment.
The client was kind enough to uninstall XenTools and export a new image snapshot. Same problem. I found that the xen*.inf drivers were still present in C:\Windows\system32\drivers and that deleting them did not fix the BSOD. Strangely, the xen drivers still appeared in the safe mode loaded drivers list after deletion from \windows\system32\drivers.
XenTools did not uninstall the drivers when its agents were uninstalled, but my attempted method to remove the drivers was also incorrect.
The working solution was mounting the image back to my working Windows instance, and (assuming the Xen sourced image is mounted at E:\ again) running a dism command to list and remove the drivers.
dism /image:E:\ /get-drivers
Deployment Image Servicing and Management tool
Version: 6.3.9600.17031

Image Version: 6.1.7600.16385

Obtaining list of 3rd party drivers from the driver store...

Driver packages listing:
...
Published Name : oem2.inf
Original File Name : xennet.inf
Inbox : No
Class Name : Net
Provider Name : Citrix
Date : 2/24/2016
Version : 8.1.0.42

Published Name : oem3.inf
Original File Name : xenvif.inf
Inbox : No
Class Name : System
Provider Name : Citrix
Date : 3/23/2016
Version : 8.1.0.62

Published Name : oem4.inf
Original File Name : xenvbd.inf
Inbox : No
Class Name : SCSIAdapter
Provider Name : Citrix
Date : 2/29/2016
Version : 8.1.0.130

Published Name : oem5.inf
Original File Name : xeniface.inf
Inbox : No
Class Name : System
Provider Name : Citrix
Date : 1/22/2016
Version : 8.1.0.26

Published Name : oem6.inf
Original File Name : xenbus.inf
Inbox : No
Class Name : System
Provider Name : Citrix
Date : 1/22/2016
Version : 8.1.0.63
...
After collecting all of the Published Name entries corresponding to the Xen drivers in the /get-drivers output, I used /remove-driver to wipe them from the image as follows:
dism /image:E:\ /remove-driver /driver:oem2.inf /driver:oem3.inf /driver:oem4.inf /driver:oem5.inf /driver:oem6.inf ...etcAfter removing the drivers, I was able to launch an instance successfully from the resulting image and boot to the Windows desktop!